SAP HANA High Availability on AWS with Pacemaker
Building a production-ready SAP HANA cluster using Pacemaker, AWS-integrated STONITH fencing, overlay IPs, quorum devices, SAPHanaSR hooks, and preload readiness validation.
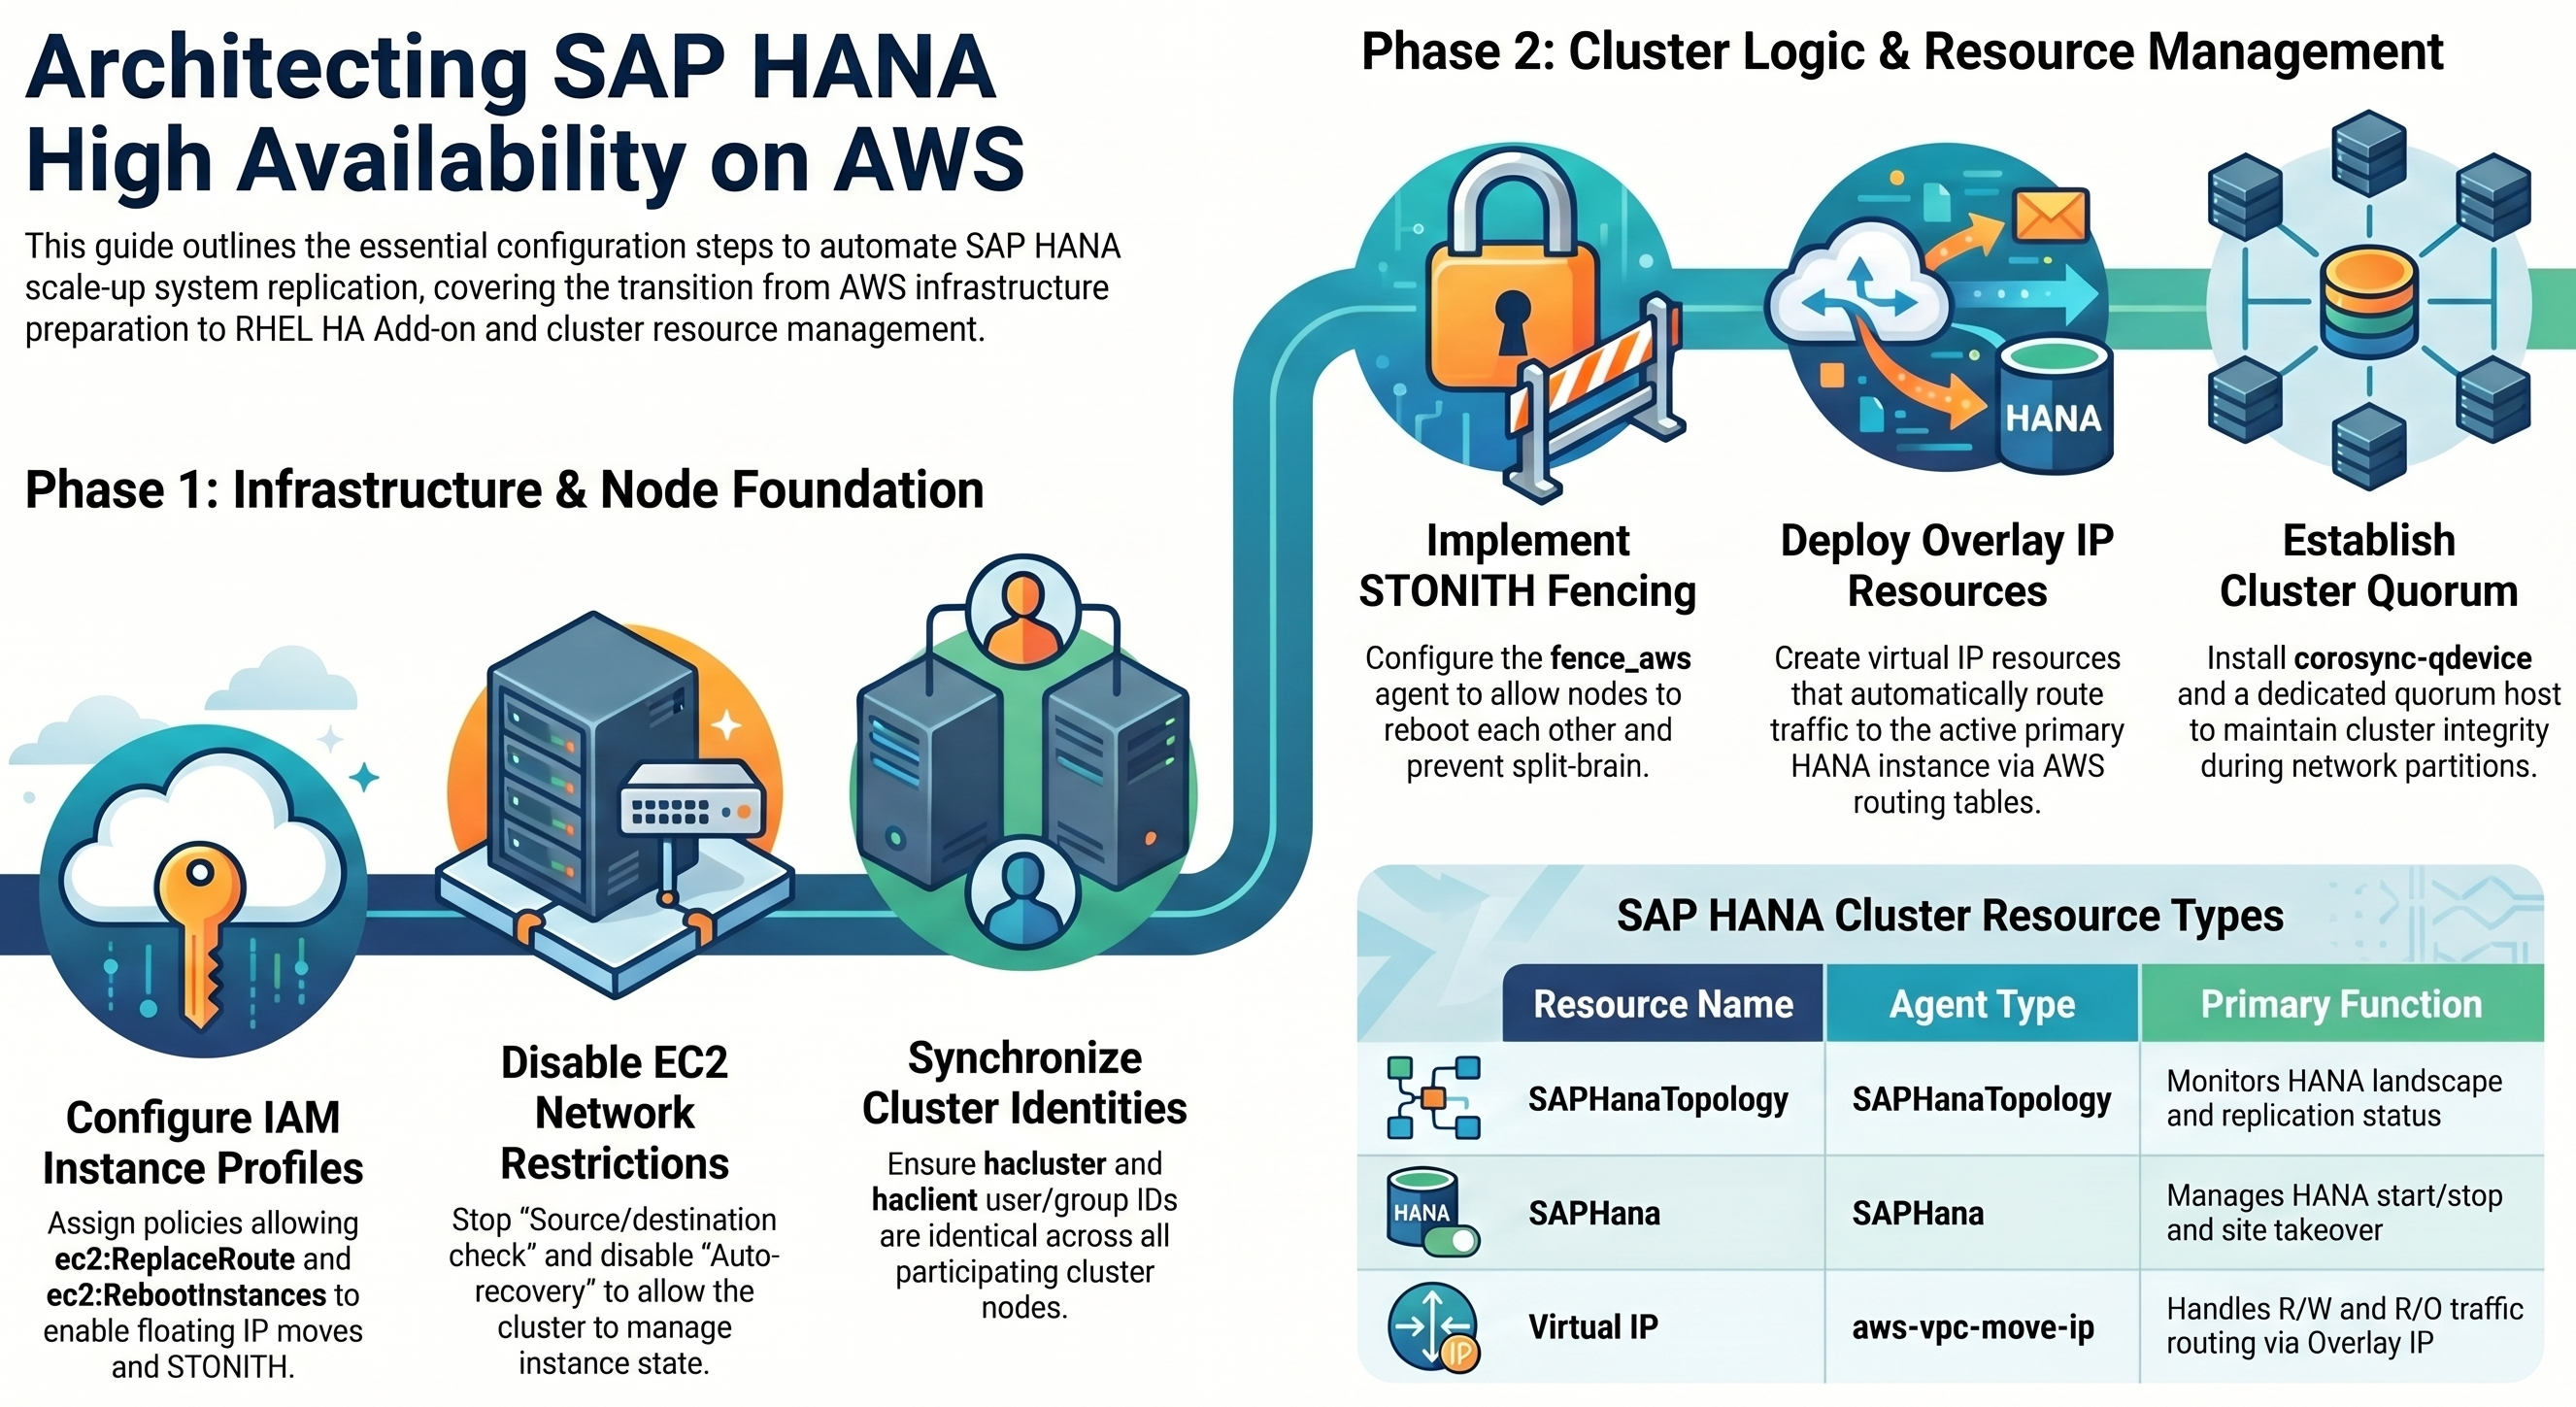
Figure 1 – Overall architecture showing SAP HANA System Replication, overlay IP resources, STONITH fencing, and a dedicated quorum device.
Introduction
Implementing SAP HANA High Availability on AWS is not particularly difficult.
Implementing it correctly is.
Most guides focus on getting SAP HANA System Replication working between two nodes. That is required, of course, but replication alone does not give you a production-ready High Availability design. The cluster also needs to make safe failover decisions, prevent split-brain, move client traffic to the correct node, validate fencing, maintain quorum, and give operators enough visibility to know when a failover is actually safe.
This guide walks through a complete SAP HANA High Availability cluster design on AWS using:
- SAP HANA System Replication
- Red Hat High Availability Add-On
- Pacemaker
- Corosync
- AWS STONITH fencing
- AWS route-table-based overlay IPs
- Read/Write and Read-Only client endpoints
- SAPHanaTopology and SAPHana resource agents
- SAPHanaSR hooks
- Corosync QDevice
- Custom HANA preload readiness validation
This is not meant to be a blind copy/paste document. Every environment is different. The values in this guide are sanitized examples. Replace the placeholders with your real AWS resource IDs, SAP SID, instance number, route table ID, overlay IPs, and instance IDs.
Fun fact: I enjoyed this project so much that I ended up writing a song about it. If you’ve ever spent days wrestling with SAP HANA System Replication, Pacemaker constraints, overlay IPs, route tables, fencing, and quorum devices, you’ll understand why finally seeing everything fail over cleanly feels worthy of its own soundtrack.
🎵 “Heartbit Failover” – Listen here:
I can’t guarantee it will help you troubleshoot a split-brain event, but it definitely captures the emotional journey of getting a HANA cluster working properly.
The examples use:
| Item | Example Value |
|---|---|
| SAP SID | HDB |
| SAP Instance Number | 00 |
| Primary-capable HANA node | hana-node-a |
| Secondary-capable HANA node | hana-node-b |
| Quorum host | hana-qdevice-01 |
| Cluster name | hana-cluster-prod |
| AWS region | us-west-2 |
| Read/Write overlay IP | 10.10.10.81 |
| Read-Only overlay IP | 10.10.10.82 |
| Route table | <route-table-id> |
| Node A instance ID | <instance-id-node-a> |
| Node B instance ID | <instance-id-node-b> |
| AWS CLI profile | cluster |
| HANA admin user | hdbadm |
Architecture Overview
The cluster uses two SAP HANA nodes and one lightweight quorum node.
| Host | Purpose |
|---|---|
hana-node-a | SAP HANA primary or secondary |
hana-node-b | SAP HANA primary or secondary |
hana-qdevice-01 | Corosync QNetd quorum device |
The HANA nodes run the database and participate in SAP HANA System Replication. The quorum host does not run SAP HANA. Its job is to provide a third vote so the two-node cluster can make deterministic decisions during communication failures.
The normal operating state looks like this:
hana-node-ais promoted and owns the Read/Write overlay IP.hana-node-bis unpromoted and owns the Read-Only overlay IP.- Both nodes run
SAPHanaTopology. fence_awsis configured and tested.- The quorum device contributes the third vote.
- Custom preload validation reports whether the secondary is ready for takeover.
Why AWS Changes the Design
In a traditional datacenter, engineers often expect a virtual IP address to move directly between servers.
AWS does not work that way.
There is no normal Layer-2 floating IP behavior between EC2 instances like you might expect in a classic VLAN. Instead, the cluster updates AWS route tables so that traffic for an overlay IP points to the network interface of the node currently owning the resource.

Figure 2 – AWS route table entries used by the Read/Write and Read-Only overlay IP resources. During failover, Pacemaker updates these routes so traffic automatically follows the active SAP HANA node.
Conceptually:
Client
  |
Overlay IP
  |
AWS Route Table
  |
Network Interface
  |
Current SAP HANA owner
That is why IAM permissions, route table IDs, and Source/Destination Check matter so much. If any of those are wrong, the cluster may look healthy while client traffic goes nowhere. Ask me how I know.
Assumptions Before Starting
This guide assumes:
- SAP HANA is already installed on both HANA nodes.
- SAP HANA System Replication is already configured or will be configured before cluster takeover is enabled.
- Both HANA nodes are in the same AWS VPC design that supports the required route-table overlay IP model.
- The Red Hat High Availability Add-On is available.
- DNS and
/etc/hostsresolution are correct between all cluster nodes. - Security groups allow cluster communication.
- You are using RHEL 9 or a supported RHEL for SAP version.
- The examples are executed as
rootunless otherwise noted.
Naming and Sanitization Used in This Guide
All internal names have been sanitized.
Use these mappings when adapting the guide:
| Sanitized Name | Meaning |
|---|---|
hana-node-a | First SAP HANA cluster node |
hana-node-b | Second SAP HANA cluster node |
hana-qdevice-01 | Quorum device host |
hana-cluster-prod | Pacemaker cluster name |
10.10.10.81 | Read/Write overlay IP |
10.10.10.82 | Read-Only overlay IP |
<route-table-id> | AWS route table used by overlay IPs |
<instance-id-node-a> | EC2 instance ID for hana-node-a |
<instance-id-node-b> | EC2 instance ID for hana-node-b |
1. Prepare AWS IAM Permissions
Both HANA nodes need an instance profile that allows the cluster to modify AWS routes and fence peer instances.
At minimum, the role needs permissions similar to this:
{
  "Version": "2012-10-17",
  "Statement": [
    {
      "Action": [
        "ec2:Describe*",
        "ec2:ReplaceRoute",
        "ec2:CreateRoute",
        "ec2:DeleteRoute"
      ],
      "Resource": "*",
      "Effect": "Allow"
    },
    {
      "Condition": {
        "StringEquals": {
          "ec2:ResourceTag/HanaCluster": [
            "Prod"
          ]
        }
      },
      "Action": [
        "ec2:ModifyInstanceAttribute",
        "ec2:RebootInstances",
        "ec2:StartInstances",
        "ec2:StopInstances"
      ],
      "Resource": "*",
      "Effect": "Allow"
    }
  ]
}
The route permissions are needed by aws-vpc-move-ip.
The start, stop, reboot, and modify permissions are needed by fence_aws.
Tag both HANA instances consistently. For example:
HanaCluster = Prod
That lets you scope fencing permissions to only the instances that belong to the cluster.
Do not skip IAM validation. A lot of AWS cluster problems are not cluster problems at all. They are permission problems wearing a fake mustache.
2. Disable AWS Source/Destination Check
Disable Source/Destination Check on both HANA EC2 instances.
You can do this in the AWS console:
EC2
  -> Instances
  -> Select instance
  -> Actions
  -> Networking
  -> Change source/destination check
  -> Stop
Or with AWS CLI:
aws ec2 modify-instance-attribute \
  --instance-id <instance-id-node-a> \
  --no-source-dest-check \
  --region us-west-2

aws ec2 modify-instance-attribute \
  --instance-id <instance-id-node-b> \
  --no-source-dest-check \
  --region us-west-2
If Source/Destination Check remains enabled, overlay IP routing will not behave correctly.
3. Disable AWS Auto Recovery
Pacemaker must own the recovery decision.
Disable AWS Auto Recovery for both HANA nodes:
aws ec2 modify-instance-maintenance-options \
  --instance-id <instance-id-node-a> \
  --auto-recovery disabled \
  --region us-west-2

aws ec2 modify-instance-maintenance-options \
  --instance-id <instance-id-node-b> \
  --auto-recovery disabled \
  --region us-west-2
You can also do this from the AWS console:
EC2
  -> Instances
  -> Select instance
  -> Actions
  -> Instance settings
  -> Change auto-recovery behavior
The point is simple: do not let AWS Auto Recovery and Pacemaker fight over the same workload.
4. Disable NetworkManager Cloud Setup
On both HANA nodes:
systemctl disable nm-cloud-setup.timer
systemctl stop nm-cloud-setup.timer
systemctl disable nm-cloud-setup
systemctl stop nm-cloud-setup
This avoids NetworkManager cloud automation interfering with the static network behavior expected by the cluster.
5. Confirm Host Resolution
Add both HANA nodes and the quorum host to /etc/hosts, or make sure DNS resolves them reliably.
Example:
10.10.20.10 hana-node-a
10.10.20.11 hana-node-b
10.10.20.12 hana-qdevice-01
Verify from each node:
getent hosts hana-node-a
getent hosts hana-node-b
getent hosts hana-qdevice-01
Make sure you use the same names everywhere.
If you create the cluster with short names, use short names in STONITH mappings. If you create the cluster with FQDNs, use FQDNs consistently.
Mixed naming in clusters is the kind of pain that looks small until it ruins your afternoon.
6. Open Security Group Traffic
Allow cluster communication between:
hana-node-ahana-node-bhana-qdevice-01
At minimum, the cluster nodes need to communicate for Corosync, PCS, and QDevice traffic.
A common internal security group rule is to allow all traffic between the cluster nodes only:
ingress {
  from_port   = 0
  to_port     = 0
  protocol    = "-1"
  description = "Cluster interconnect"
  cidr_blocks = [
    "<hana-node-a-private-cidr>",
    "<hana-node-b-private-cidr>",
    "<hana-qdevice-private-cidr>"
  ]
}
Use your security standards, but make sure the cluster nodes can actually talk to each other.
7. Create Internal Network Load Balancers
The overlay IPs provide the failover targets, but clients still need stable endpoints to connect to.
In this design, two internal AWS Network Load Balancers sit in front of the overlay IPs:
| Load Balancer | Purpose | Target |
|---|---|---|
hana-rw-nlb | Read/Write HANA traffic | 10.10.10.81 |
hana-ro-nlb | Read-Only HANA traffic | 10.10.10.82 |
Each load balancer uses TCP listeners for the required SAP HANA ports. Each listener forwards to an IP-based target group, and each target group registers the corresponding overlay IP as its target.
The important detail is that the load balancers do not decide which HANA node is primary or secondary. Pacemaker still owns that decision.
The load balancers provide stable client entry points. Pacemaker moves the overlay routes underneath them.
Conceptually:
Client
  |
Internal Network Load Balancer
  |
Overlay IP target
  |
AWS Route Table
  |
Network Interface
  |
Current SAP HANA owner
Build the load balancer layer with:
- One internal Network Load Balancer for Read/Write traffic.
- One internal Network Load Balancer for Read-Only traffic.
- TCP listeners for the required SAP HANA ports.
- IP target groups for each listener.
- Target group attachments pointing to the appropriate overlay IP.
- Cross-zone load balancing enabled across the selected application subnets.
This keeps the client endpoint stable while still allowing Pacemaker to control actual HANA ownership through route-table updates.
8. Install Cluster Packages
On both HANA nodes:
dnf install -y pcs pacemaker fence-agents-all fence-agents-aws \
  resource-agents-cloud resource-agents-sap-hana
Start and enable pcsd:
systemctl start pcsd
systemctl enable pcsd
systemctl status pcsd
Set the hacluster password on both HANA nodes:
passwd hacluster
Make sure the hacluster user and haclient group have consistent IDs across all cluster nodes.
Check:
id hacluster
getent group haclient
9. Authenticate the Cluster Nodes
From one HANA node:
pcs host auth hana-node-a hana-node-b
Use the hacluster credentials when prompted.
10. Create the Pacemaker Cluster
Create and start the cluster:
pcs cluster setup --start --enable hana-cluster-prod hana-node-a hana-node-b
Enable the cluster on all nodes:
pcs cluster enable --all
Check status:
pcs cluster status
pcs status
Optional, but useful for AWS environments where latency can be less predictable than a local datacenter:
pcs cluster config update totem token=29000
At this point, the cluster should be running, but it should not yet manage SAP HANA.
11. Install and Configure AWS CLI
The AWS fencing and overlay IP agents need AWS access.
Install AWS CLI v2 if needed:
cd /tmp
curl "https://awscli.amazonaws.com/awscli-exe-linux-x86_64.zip" -o "awscliv2.zip"
unzip awscliv2.zip
cd aws
./install
Configure one AWS CLI profile for the cluster:
aws configure --profile cluster
Example:
AWS Access Key ID [None]: <access-key-or-use-instance-role>
AWS Secret Access Key [None]: <secret-key-or-use-instance-role>
Default region name [None]: us-west-2
Default output format [None]: json
If you use instance profiles, keep the configuration minimal. The important thing is that the cluster agents use the same profile name consistently.
This guide uses:
profile=cluster
12. Configure STONITH with fence_aws
Install the AWS fence agent if not already installed:
dnf install -y fence-agents-aws
Create the STONITH resource:
pcs stonith create aws-cluster-fence fence_aws \
  region=us-west-2 \
  pcmk_host_map="hana-node-a:<instance-id-node-a>;hana-node-b:<instance-id-node-b>" \
  pcmk_delay_max=45 \
  pcmk_reboot_action=off \
  power_timeout=600 \
  pcmk_reboot_timeout=600 \
  pcmk_reboot_retries=4 \
  op start timeout=600 \
  op monitor interval=300 timeout=60
Important:
- Use the exact node names used when creating the cluster.
- Replace the instance IDs with your real EC2 instance IDs.
- Test this before production.
Test fencing:
pcs stonith fence hana-node-a
After the test, clear STONITH history:
pcs stonith history cleanup
Check status:
pcs status
If fencing does not work, stop here. Do not keep building the cluster pretending it will be fine. It will not be fine.
13. Create the Read/Write Overlay IP
The Read/Write overlay IP follows the promoted SAP HANA node.
Create the resource:
pcs resource create hana-rw-ip aws-vpc-move-ip \
  ip=10.10.10.81 \
  routing_table=<route-table-id> \
  interface=eth0 \
  profile=cluster \
  lookup_type=NetworkInterfaceId \
  op start interval=0 timeout=180 \
  op stop interval=0 timeout=180 \
  op monitor interval=60 timeout=60
Verify:
pcs status
Test movement:
pcs resource move hana-rw-ip
pcs status
Clear the temporary move constraint afterward:
pcs resource clear hana-rw-ip
This test confirms that the cluster can update AWS route tables.
14. Configure SAPHanaSR Hooks
Copy the hooks to a shared location visible to HANA:
mkdir -p /hana/shared/myHooks
cp /usr/share/SAPHanaSR/* /hana/shared/myHooks/
Update HANA global configuration on both nodes:
/hana/shared/HDB/global/hdb/custom/config/global.ini
Add:
[ha_dr_provider_SAPHanaSR]
provider = SAPHanaSR
path = /hana/shared/myHooks
execution_order = 1

[ha_dr_provider_chksrv]
provider = ChkSrv
path = /hana/shared/myHooks
execution_order = 2
action_on_lost = kill
Reload the HADR providers as the HANA admin user:
su - hdbadm
hdbnsutil -reloadHADRProviders
Verify initialization:
cdtrace
cat nameserver_chksrv.trc
You want to see that the providers are loaded cleanly.
15. Configure sudoers for SAPHanaSR Hooks
The hook needs to write SAP HANA replication state into Pacemaker cluster attributes.
Create a sudoers file such as:
visudo -f /etc/sudoers.d/99-saphanasr
Example sanitized sudoers configuration:
# SAPHanaSR Scale-Up entries for writing srHook cluster attributes

Cmnd_Alias SOK_SITEA   = /usr/sbin/crm_attribute -n hana_hdb_site_srHook_siteA -v SOK -t crm_config -s SAPHanaSR
Cmnd_Alias SFAIL_SITEA = /usr/sbin/crm_attribute -n hana_hdb_site_srHook_siteA -v SFAIL -t crm_config -s SAPHanaSR
Cmnd_Alias SOK_SITEB   = /usr/sbin/crm_attribute -n hana_hdb_site_srHook_siteB -v SOK -t crm_config -s SAPHanaSR
Cmnd_Alias SFAIL_SITEB = /usr/sbin/crm_attribute -n hana_hdb_site_srHook_siteB -v SFAIL -t crm_config -s SAPHanaSR

hdbadm ALL=(ALL) NOPASSWD: SOK_SITEA, SFAIL_SITEA, SOK_SITEB, SFAIL_SITEB
Defaults!SOK_SITEA, SFAIL_SITEA, SOK_SITEB, SFAIL_SITEB !requiretty
Validate syntax:
visudo -c
16. Disable Native SAP HANA systemd Startup
Pacemaker should manage HANA, not systemd.
On both HANA nodes:
systemctl disable SAPHDB_00
Do not let systemd and Pacemaker both try to own HANA startup.
17. Create the SAPHanaTopology Resource
Create the topology resource:
pcs resource create SAPHanaTopology_HDB_00 SAPHanaTopology \
  SID=HDB \
  InstanceNumber=00 \
  op start timeout=600 \
  op stop timeout=300 \
  op monitor interval=10 timeout=600 \
  clone clone-max=2 clone-node-max=1 interleave=true
Check:
pcs status
The topology clone should run on both HANA nodes.
18. Create the SAPHana Resource
Create the promotable HANA resource:
pcs resource create SAPHana_HDB_00 SAPHana \
  SID=HDB \
  InstanceNumber=00 \
  PREFER_SITE_TAKEOVER=true \
  DUPLICATE_PRIMARY_TIMEOUT=7200 \
  AUTOMATED_REGISTER=true \
  op start interval=0 timeout=600 \
  op stop timeout=600 \
  op monitor interval=61 role=Unpromoted timeout=700 \
  op monitor interval=59 role=Promoted timeout=700 \
  op promote timeout=1800 \
  op demote timeout=1800 \
  promotable notify=true clone-max=2 clone-node-max=1 interleave=true
Add failure cleanup behavior:
pcs resource meta SAPHana_HDB_00 failure-timeout=180
Check status:
pcs status
You should eventually see one promoted HANA node and one unpromoted HANA node.
19. Add Resource Ordering and Colocation Constraints
The topology resource should start before the HANA resource:
pcs constraint order SAPHanaTopology_HDB_00-clone then SAPHana_HDB_00-clone symmetrical=false
The Read/Write overlay IP should run with the promoted SAP HANA node:
pcs constraint colocation add hana-rw-ip with promoted SAPHana_HDB_00-clone 2000
Check constraints:
pcs constraint
20. Create the Read-Only Overlay IP
The Read-Only overlay IP normally follows the synchronized secondary node.
Create the resource:
pcs resource create hana-ro-ip aws-vpc-move-ip \
  ip=10.10.10.82 \
  routing_table=<route-table-id> \
  interface=eth0 \
  profile=cluster \
  lookup_type=NetworkInterfaceId \
  op start interval=0 timeout=180 \
  op stop interval=0 timeout=180 \
  op monitor interval=60 timeout=60
Add location rules:
pcs constraint location hana-ro-ip rule score=INFINITY \
  hana_hdb_sync_state eq SOK and \
  hana_hdb_roles eq 4:S:master1:master:worker:master
pcs constraint location hana-ro-ip rule score=2000 \
  hana_hdb_sync_state eq PRIM and \
  hana_hdb_roles eq 4:P:master1:master:worker:master
Check:
pcs constraint
pcs status
Expected behavior:
- If primary and secondary are healthy and replication is synchronized, the Read-Only IP runs on the secondary.
- If the secondary is down or not synchronized, the Read-Only IP runs on the primary.
- After failover, the Read-Only IP remains where safe until the new secondary is registered and synchronized again.
This is one of those details that makes the cluster feel a lot smarter than a simple “move everything to one node” design.
21. Validate the Cluster State
A healthy cluster should look conceptually like this:
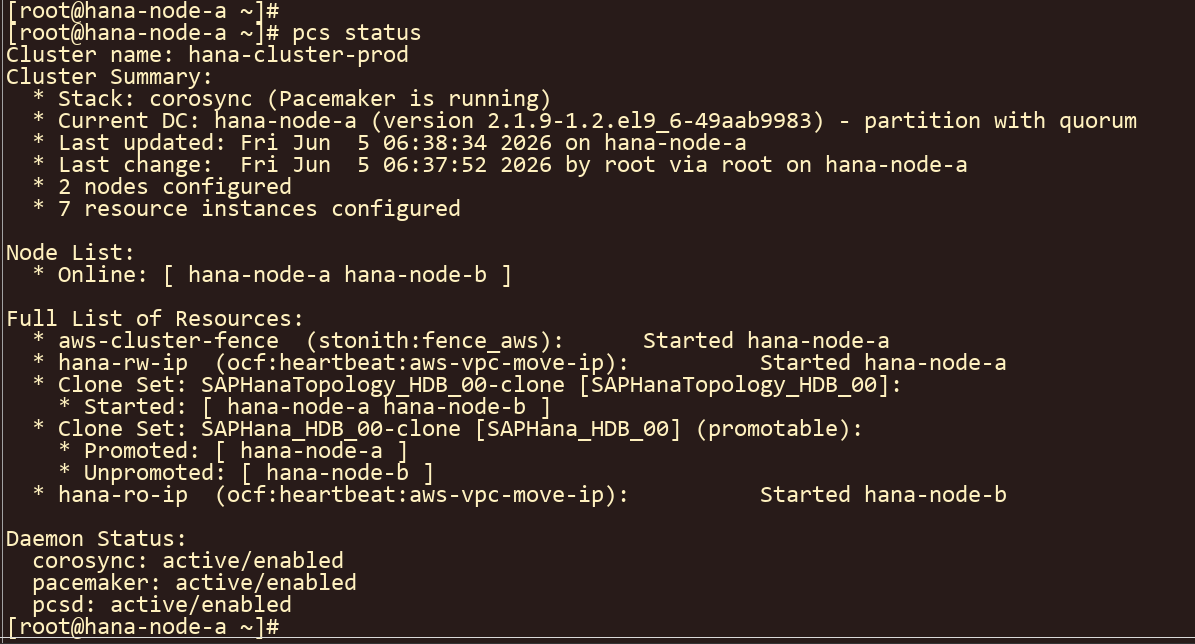
Figure 3 – Healthy cluster state showing both SAP HANA nodes online, the Read/Write overlay IP hosted on the primary node, and the Read-Only overlay IP hosted on the secondary node.
Useful commands:
pcs status
crm_mon -Afr1
Expected resource layout:
aws-cluster-fence        Started
hana-rw-ip               Started hana-node-a
SAPHanaTopology_HDB_00   Started hana-node-a hana-node-b
SAPHana_HDB_00           Promoted hana-node-a
SAPHana_HDB_00           Unpromoted hana-node-b
hana-ro-ip               Started hana-node-b
In crm_mon -Afr1, look for:
hana_hdb_srmode        : syncmem
hana_hdb_sync_state    : PRIM
hana_hdb_sync_state    : SOK
hana_hdb_roles         : 4:P:master1:master:worker:master
hana_hdb_roles         : 4:S:master1:master:worker:master
22. Configure the Quorum Device
Two-node clusters are always tricky. A quorum device gives the cluster a third vote.
On both HANA nodes:
dnf install -y corosync-qdevice
On the quorum host:
dnf install -y pcs corosync-qnetd
systemctl start pcsd.service
systemctl enable pcsd.service
On the quorum host, initialize and start QNetd:
pcs qdevice setup model net --enable --start
pcs qdevice status net --full
From one HANA node, authenticate the quorum host:
pcs host auth hana-qdevice-01
Add the quorum device:
pcs quorum device add model net host=hana-qdevice-01 algorithm=ffsplit
Check quorum:
pcs quorum status
pcs quorum device status
Expected:
Expected votes:   3
Total votes:      3
Quorum:           2
Flags:            Quorate Qdevice
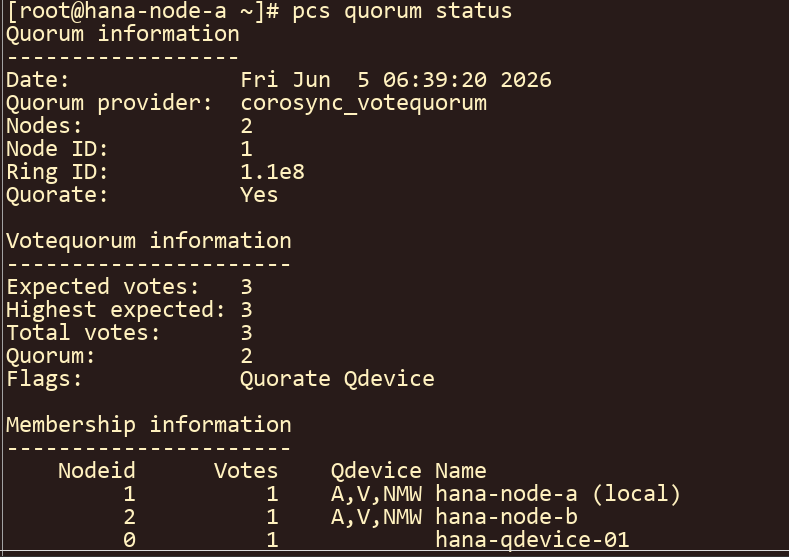
Figure 5 – Quorum validation showing two SAP HANA cluster votes plus the additional vote provided by the dedicated quorum device.
That third vote is cheap insurance. Use it.
23. Add Custom HANA Preload Readiness Validation
This is the part I like the most, because it solves a real operational problem.
Replication can be healthy while the secondary is still not fully ready to take production load. The custom preload validation checks HANA trace files and publishes a Pacemaker node attribute:
hana_hdb_preload_status
Possible values:
complete
pending
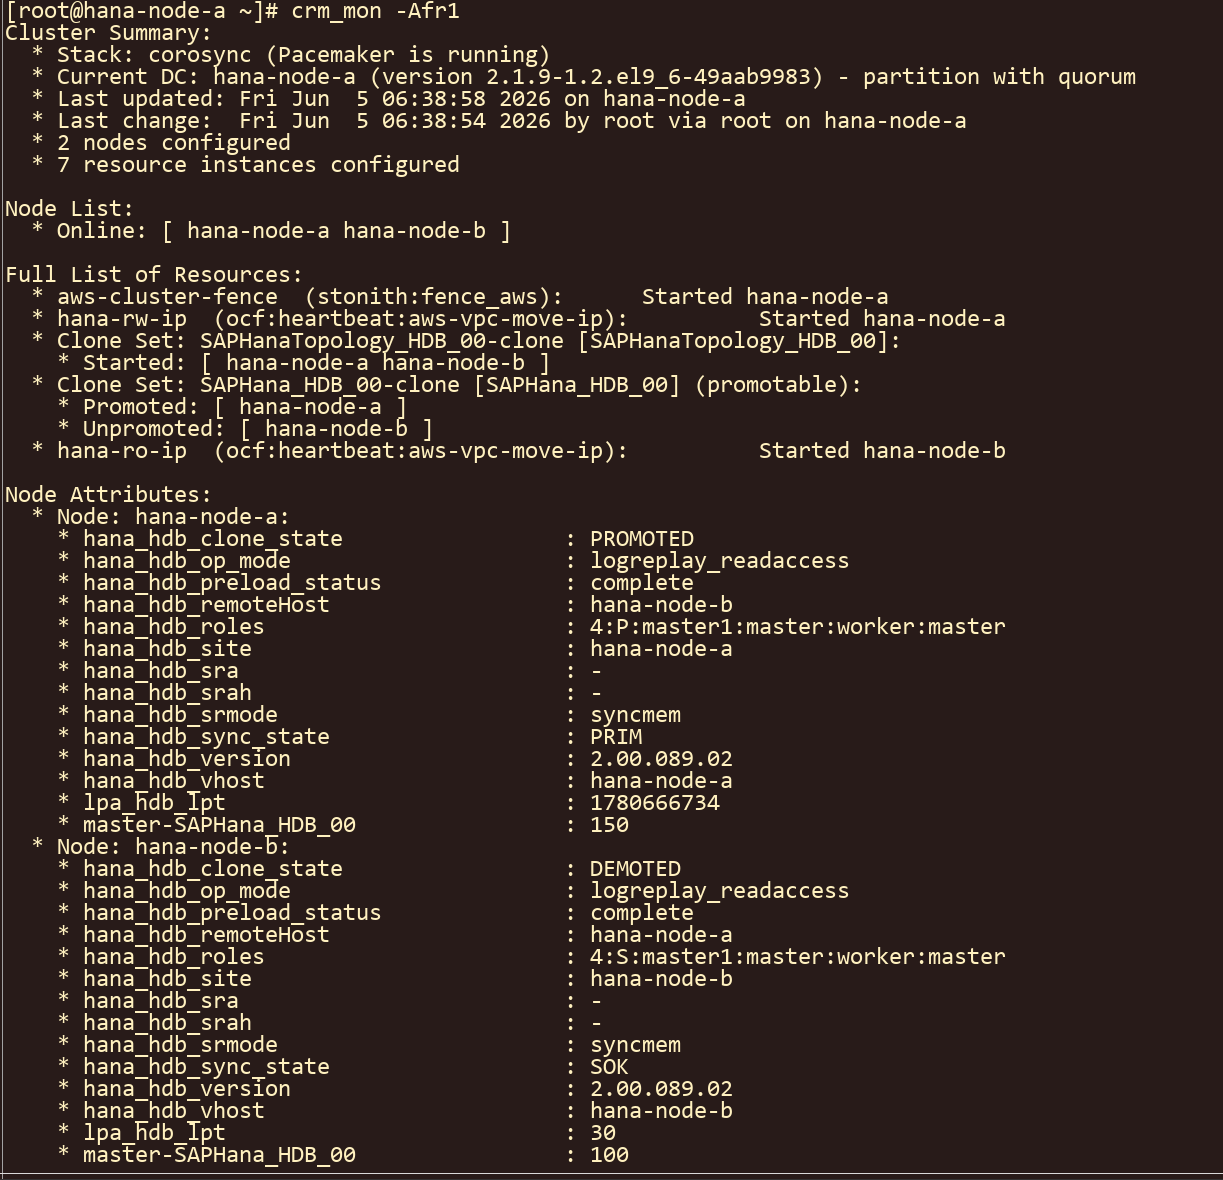
Figure 4 – Cluster attributes showing replication state, synchronization health, and preload readiness validation for both SAP HANA nodes.
This attribute can then be used by patching or maintenance automation before triggering failover.
24. Create the Preload Check Script
Create:
vi /usr/local/bin/check-hana-preload-status.sh
Add:
#!/bin/bash

LOGFILE="/var/log/pacemaker/pacemaker.log"
base_dir="/usr/sap/HDB/HDB00/$(hostname)/trace"

cd "$base_dir" || exit 1

dbs=(DB_*)
preload_complete=1

for database in "${dbs[@]}"; do
    latest_file=$(ls -rt "$database"/indexserver_$(hostname).?????.???.trc 2>/dev/null | tail -1)

    if [ -n "$latest_file" ]; then
        result=$(grep "isPreloadComplete" "$latest_file" | tail -1)

        if [ -z "$result" ]; then
            echo "No preload info found for $database — assuming preload complete"
        elif echo "$result" | grep -q "isPreloadComplete.*: 1"; then
            echo "Preload complete for $database"
        else
            echo "Preload NOT complete for $database"
            preload_complete=0
        fi
    else
        echo "No trace file found for $database — assuming preload complete"
    fi
done

echo "Final result: $preload_complete"

if [ "$preload_complete" -eq 1 ]; then
    crm_attribute --node="$(hostname)" \
      --name=hana_hdb_preload_status \
      --update="complete" \
      --lifetime=reboot 2>>"$LOGFILE"

    echo "$(date '+%b %d %T') HANA Preload Status: complete" >> "$LOGFILE"

    if [ $? -ne 0 ]; then
        echo "$(date): Error updating hana_hdb_preload_status on $(hostname)" >> "$LOGFILE"
        exit 1
    fi
else
    crm_attribute --node="$(hostname)" \
      --name=hana_hdb_preload_status \
      --update="pending" \
      --lifetime=reboot 2>>"$LOGFILE"

    echo "$(date '+%b %d %T') HANA Preload Status: pending" >> "$LOGFILE"

    if [ $? -ne 0 ]; then
        echo "$(date): Error updating hana_hdb_preload_status on $(hostname)" >> "$LOGFILE"
        exit 1
    fi
fi
Make it executable:
chmod u+x /usr/local/bin/check-hana-preload-status.sh
Run it manually once:
/usr/local/bin/check-hana-preload-status.sh
Check the attribute:
crm_mon -Afr1 | grep hana_hdb_preload_status
25. Create the systemd Service
Create:
vi /usr/lib/systemd/system/hana-preload-check.service
Add:
[Unit]
Description=Run HANA preload status check

[Service]
Type=oneshot
ExecStart=/usr/local/bin/check-hana-preload-status.sh
26. Create the systemd Timer
Create:
vi /usr/lib/systemd/system/hana-preload-check.timer
Add:
[Unit]
Description=Run preload check every 30 seconds

[Timer]
OnBootSec=30s
OnUnitActiveSec=30s
AccuracySec=1s
Unit=hana-preload-check.service

[Install]
WantedBy=timers.target
Reload systemd:
systemctl daemon-reload
Enable and start the timer:
systemctl enable --now hana-preload-check.timer
Check:
systemctl status hana-preload-check.timer
systemctl list-timers | grep hana-preload
Check the cluster attribute again:
crm_mon -Afr1 | grep hana_hdb_preload_status
This should eventually show:
hana_hdb_preload_status : complete
on the appropriate nodes.
27. Final Validation Checklist
Before calling this production-ready, validate each item.
Cluster Health
pcs status
crm_mon -Afr1
Confirm:
- Both nodes online
- STONITH started
- HANA topology running on both nodes
- One HANA resource promoted
- One HANA resource unpromoted
- Read/Write IP on promoted node
- Read-Only IP on secondary node when replication is synchronized
STONITH
pcs stonith fence hana-node-a
pcs stonith history cleanup
Repeat for the other node during a controlled maintenance window.
Overlay IPs
pcs resource move hana-rw-ip
pcs status
pcs resource clear hana-rw-ip
Also verify the AWS route table updates.
HANA Replication Attributes
crm_mon -Afr1
Look for:
hana_hdb_sync_state : PRIM
hana_hdb_sync_state : SOK
hana_hdb_srmode     : syncmem
Quorum
pcs quorum status
Look for:
Expected votes: 3
Total votes: 3
Flags: Quorate Qdevice
Preload Readiness
crm_mon -Afr1 | grep hana_hdb_preload_status
Look for:
hana_hdb_preload_status : complete
28. Example Healthy State
A healthy cluster should tell a clear story:
hana-node-a:
  promoted
  primary
  owns Read/Write IP

hana-node-b:
  unpromoted
  secondary
  synchronized
  owns Read-Only IP

hana-qdevice-01:
  contributes quorum vote
If the output does not tell that story, do not ignore it.
The cluster is usually telling you something. Sometimes it whispers. Sometimes it screams. Either way, listen.
Lessons Learned
Disable Source/Destination Check Early
If overlay IPs are not behaving, check this before going too deep into Pacemaker.
Let Pacemaker Own Recovery
AWS Auto Recovery is useful, but not for this workload. The cluster should own the recovery decision.
Test STONITH
Configured is not the same as tested. A cluster with untested fencing is a polite disaster waiting for the right moment.
Validate IAM Permissions Early
If route movement or fencing fails, check IAM before blaming the resource agent.
Keep Names Consistent
Use the same hostnames everywhere: cluster setup, STONITH maps, /etc/hosts, constraints, and documentation.
Quorum Devices Are Worth It
A lightweight quorum host gives a two-node cluster a third vote. That is a very good trade.
Replication Is Not Readiness
This was the big operational lesson.
SOK means replication is synchronized. It does not necessarily mean the secondary is fully preloaded and ready for production traffic.
The hana_hdb_preload_status attribute closes that visibility gap.
Conclusion
Building SAP HANA High Availability on AWS requires more than simply enabling System Replication.
A production-ready design needs:
- Reliable fencing
- Predictable client connectivity
- AWS route-table overlay IPs
- HANA-aware Pacemaker resources
- Replication hooks
- Quorum protection
- Operational validation
- Preload readiness awareness
When these layers work together, the result is a cluster that does more than fail over. It fails over in a way that is controlled, observable, and safe.
And that is the whole point.
High Availability is not magic.
It is a collection of boring details done correctly.
Unfortunately, the boring details are usually the ones that save you at 2 AM.